When cooked properly, chicken is a delicious and juicy meat that is a staple in many households. It is also one of the most affordable meats in the UK and is available in various cuts, with chicken breasts being one of the most popular options.
Chicken breasts are versatile in the kitchen, but unfortunately, they have a reputation for coming out dry and tough.
But before you give up on chicken breasts for good, read this article.
Below are our top tips on how to stop chicken breasts from drying out. Try out a few for yourself, and you’ll never have to suffer through an overcooked chicken dinner again.
1. Use a Marinade

One of the best ways to lock moisture into your chicken breasts is by coating them in a delicious marinade.
Adding seasoning to your chicken can help enhance its flavor, as the meat can be quite bland on its own.
You can use any combination of flavours and aromatics to marinate your chicken breasts.
Using soy sauce, buttermilk, olive oil, or yogurt as a base is ideal for adding moisture to the chicken, but you can also experiment with a range of herbs, spices, and other flavorful ingredients to build up the taste.
We recommend lightly slashing each chicken breast before coating them in your marinade. This gives a greater surface area for your seasoning to cling to and will speed up the cooking process, further preventing dryness.
If possible, allow your chicken to marinate overnight for the best results.
2. Brine the Chicken
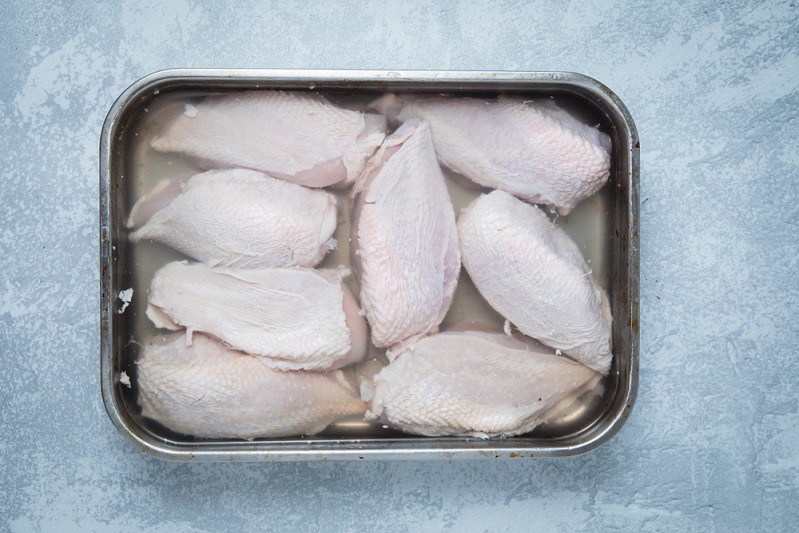
If you don’t want to marinate your chicken breasts, another option is to soak them in brine.
This will increase the water content of the chicken before cooking, therefore allowing it to remain moist even as it loses some of its juices. It will also subtly boost the natural flavour of the chicken.
To create your own brine, add a few teaspoons of salt and a pinch of sugar to a bowl of lukewarm water. Stir the solution until everything has dissolved, and then soak your chicken breasts for at least 15 minutes before cooking.
3. Baste the Chicken
You may have come across the term “basting” when it comes to steak, but this cooking technique can also be used when preparing chicken breasts.
The idea is to periodically spoon some of the liquid surrounding your chicken over the meat throughout the cooking process.
Depending on how you cook your chicken, this liquid can be a mix of butter, oil, fat, or water.
Regularly pouring these liquids over your chicken breasts will redistribute the juices throughout the chicken, keeping it moist. It can also help to cook the breasts more evenly end enhance their flavour.
4. Use a Tenderiser
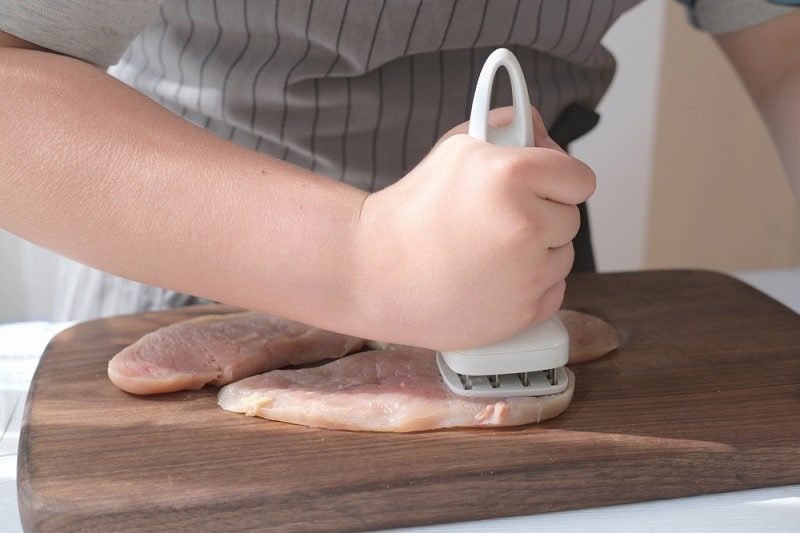
Tenderising chicken helps to break down the tough fibres of the meat and will allow heat to distribute more evenly throughout the breast.
This means the entire chicken breast will cook at the same rate, helping you to avoid overcooking thinner sections of the breast while trying to cook thicker sections all the way through.
It is best to use a meat mallet when tenderising chicken, but another heavy object (such as a rolling pin or the base of a pan) will do the trick if you don’t have one available.
Place the meat on a flat surface, put a piece of cling film over the top, and pound the chicken until it is roughly a ¼ inch thick.
5. Weigh Down the Chicken
When frying chicken breasts on the hob, you have the option of weighing them down during cooking.
The added weight will help to distribute the heat in the pan for more even cooking and will prevent evaporation from the surface of the meat.
Once again, any heavy object can be used for this purpose as long as it fully covers your chicken breasts.
We suggest trying a brick or cast iron pan if possible. Before placing your chosen object on top of the chicken, wrap the base in aluminium foil to prevent any direct contact with the raw meat.
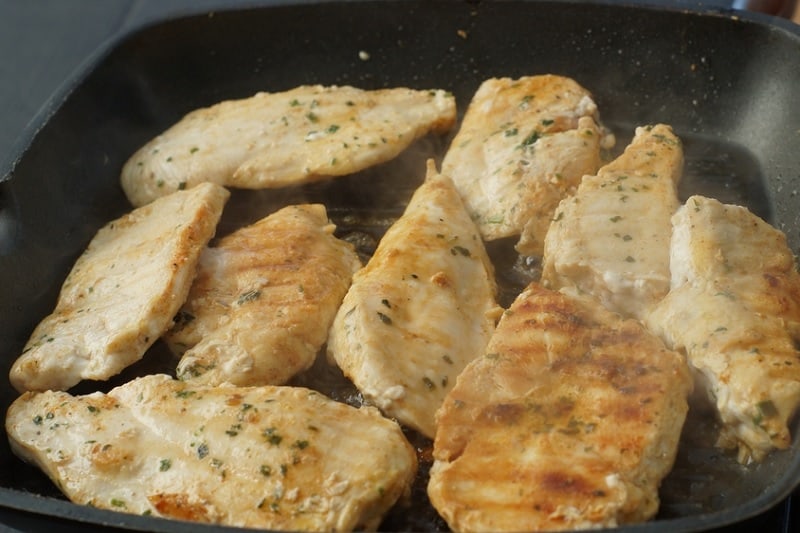
6. Sear the Chicken Skin
When baking chicken breasts in the oven, we suggest searing the skin in a pan beforehand.
Chicken skin naturally helps to contain the juices within a chicken breast, and searing makes this process more effective.
To perfectly sear the skin, season the chicken breast and place it in a pan with hot oil. Leave the chicken for a few minutes until the skin is golden brown, and then flip the breast so the same can be done to the other side. You can then bake the chicken as usual.
Obviously, you cannot do this if you have purchased skinless chicken breasts, so in that case, you will have to use some of the other tips in this list instead.
7. Cook the Chicken in Milk
This next tip may sound a bit unconventional, but roasting a chicken breast in milk is one of the best ways to ensure your meat stays juicy and tender throughout cooking.
This is because milk doesn’t conduct as much heat as water, and so less of the chicken juices are extracted from the meat.
For the best results, we recommend searing your chicken breasts in a pan and then transferring them to a baking dish.
You then need to pour 4 to 5 tablespoons of milk over the chicken and bake at 180 degrees for 25-30 minutes.
Always check that your chicken is fully cooked before serving, and feel free to add a bit more milk if the chicken starts to look dry.
Jamie Oliver has an excellent recipe for a whole chicken if you want to try out this tip on a larger scale.
You can also take inspiration from his seasoning to add additional flavour to your dish when cooking chicken breasts if desired.
8. Dry-Poach the Chicken
Another easy way of cooking chicken breasts and retaining their moisture is dry-poaching. This may sound very technical, but the process is actually straightforward.
To properly dry-poach your chicken breasts, all you have to do is wrap each breast in baking paper (parchment paper in the US).
You can then bake them in the oven as you typically would. The idea behind this technique is that the paper acts as chicken skin: it protects the chicken breast and prevents water from evaporating.
9. Use a Meat Thermometer

The most common way of checking to see if a chicken breast is cooked is to cut it open and see if the inside is no longer pink. Although this does work, it often results in overcooked chicken and allows any remaining juices to run out of the breast.
As an alternative to this method, we suggest investing in a meat thermometer. This device will allow you to check the internal temperature of your chicken breasts and tell if they are fully cooked without releasing these juices.
When checking the internal temperature of the chicken breast, you want to place the thermometer in the thickest section of meat. Once this part of the chicken breast has reached 74 degrees Celsius (165 Fahrenheit), it will be fully cooked.
Be warned that your chicken may have a slightly pinkish tinge at this point, but allowing the temperature to rise above this will result in overcooked, dry chicken.
10. Allow the Chicken to Rest
Our final tip for preventing dried-out chicken is to let the meat rest once it has been cooked.
It can be tempting to dig into your meal straight away, but slicing your chicken too early will cause any remaining juices to run onto the chopping board rather than be retained in the meat.
For a chicken breast, we recommend leaving it to rest for roughly 5 minutes. This will allow any remaining juices in the meat to distribute themselves around the whole chicken breast, therefore making it much more succulent to eat.

Hannah is a freelance content writer and self-proclaimed foodie. When Hannah isn’t sitting tapping at her laptop, you’ll probably find her in the kitchen. As an ex-chalet host, she’s used to cooking four-course meals for 10+ people and loves feeding friends and family whenever possible.
